
Notice the prall in the fourth measure above is not prepared with a thumb on the previous 16th, but with finger 3. This is necessary because the preparation note is above the prall, rather than below as is previous examples. This requires change in mechanics from what we've done before. One of the most important aspects in the execution of repeated prall-triplets is the thumb withdrawal on the final 16th accompanied by the rolling of the hand forward so as to reach the next prall. How do we compensate in the new situation? My gently sliding finger 3 under the hand as the note is played, meanwhile rolling the hand forward as before. If you're using proper mechanics, you're already depressing keys by drawing finger 3 slightly under the hand. Preparing a prall with finger 3 is just a slight exaggeration of this motion. It takes lots of slow practice, but it is not intrinsically difficult.
Here are a few melodies to practice preparing a prall with finger 3. Remember to practice fragments before tacking the entire phrase.
In the fragments above, finger 3 precedes the prall on the same note as the auxillary. When the preceding note is a step higher than the auxillary, fingers 3 or 4 offers distinct advantages and disadvantages. Finger 3 is usually stronger, but must be moved into position after the start of the prall, impairing smoothness and speed. Finger 4 is usually weaker, but using it allows finger 3 to be positioned before the start of the prall, facilitating smoothness and speed. Sometimes using finger 4 is awkward because 2, 3 and 4 are packed together and get in each other's way. Pick the finger that works the best for you in each situation.
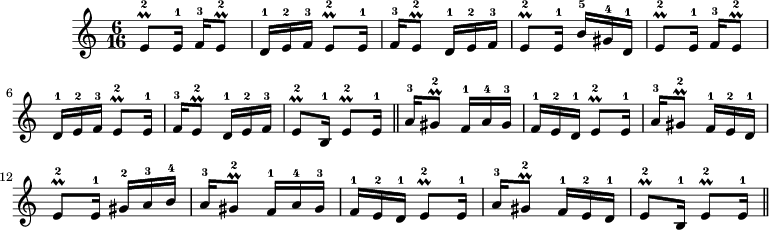
In the example below, all prall preparations from above are taken with finger 4, except for a pragmatic use of finger 1 in bar 13.

In the example below, C#s preceding B pralls (bars 1, 3 & 5) are taken with finger 3 despite the necessity of switching position during the prall because the use 4 would lead to a very cramped position. Also, the movement of finger 3 from C# down to B is (black key to white key) is "downhill" and quite easy. The opposite "uphill" transition (white to black) is more difficult because the finger must be lifted. The B preceding A pralls (bar 4) are taken with 4.
When the note preceding is a 3rd or more above the prall, use fingers 4 or 5 as befits the situation. Each finger offers slightly different mechanics from finger 3 and is worth practicing on it's own. In the example below, finger 4 on B prepares pralls on G# (bars 1, 3 & 5).

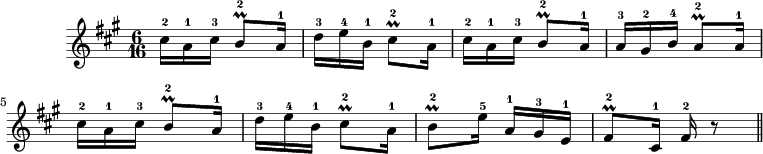
The first melody below is from Kosta Kolev's "Novozagorsko horo" and uses finger 5 preparation once (bar 4). The second melody is contrived for more intensive practice of the technique:


Concerning repeats: In my notation, separate all melodies with double bars. I do not provide specific instructions for the number of repeats, so the player must decide how times sounds right. Generally, each melody occupies about the same amount of time. Sometimes you need to move on the next early, sometimes you want to savor a melody a bit longer. The choice is yours. In private practice, you probably want to take more repeats than in public performance. Playing the entire piece through with no repeats is probably the least attractive option, and terrible for effective practice.
Copyright 2015 Erik Butterworth. All rights reserved.