
Note: This is an older version of the technique and fingering portion of my tutorial. For a description of the differences between the approach described here and my present approach, see the current version (still largely incomplete).
This page describes the principles of accordion technique and fingering needed to play Bulgarian dance tunes once their outline and ornamentation have been set (see Setting a Tune). It employs terminology described in Definitions. The aim is to enable smooth, precise, consistent and (relatively) effortless playing.
Contents:
My technical approach is based upon the following basic principles of anatomy and physiology:
Bulgarian accordion can be played standing or sitting, and should be practiced both ways. In either case, the instrument should be mounted solidly on your body so that is not constantly shifting beneath your hands. While standing, take care not to counter balance the weight of the instrument by swaying your back. This will hurt your back over time. Instead, stand solidly with feet spread about the distance of your shoulders, with slightly bent knees. Angle your shoulders slightly forward of your hips, using your hips (not your back) to counterbalance the instrument's weight. While sitting, the keyboard will dip somewhat between your legs. Extend your right knee outward to allow access to the upper keyboard.
Not yet written.
Optimal hand attitude to the keyboard is achived though a combination of shoulder, elbow and wrist angles. The right shoulder should be relaxed and mobile. The right elbow is slightly raised from its natural position, drawing the shoulder slightly away from the body and angling the forearm back toward the keyboard. The elbow angle varies as the hand moves between the upper and lower keyboard. When on the lower keyboard, it is important that the elbow angle not become too acute, creating tension in the muscles of the upper and lower arm, and impairing finger mechanics. The join of the forearm and wrist should be straight or nearly so. A marked angle at this join impairs finger motion, and can be relieved by elevating the elbow with the shoulder accomodating the elbow's motion. The hand, neutrally angled and rotated, should be elevated so that the thumb knuckle is slightly above the plane of the keyboard. This will allow both fingers and thumb to depress keys by moving directly downward and inward from the neutral position of the hand.
Motions of the fingers, hand and wrist while playing may be systematized as five axes of motion:
The anatomy and playing mechanics of the hand are surprisingly complex. Each finger has a different length and different constraints of motion. Only finger 1 capable is independent angle and tilt. Fingers 2-5 tilt as a group and mostly angle as a group. Independent angling of fingers 2-5 is strain inducing and not recommended. Insertion and wrist rotation affect all fingers at once. Angling the hand right causes finger 1 to insert more deeply, while angling left causes finger 1 to withdraw.
Minimizing extraneous motion requires being aware of each of these interconnected axes of motion, and utilizing only those axes that apply to the mechanical task at hand. Extreme positions in any axis of motions induce greater fatigue than neutral positions, so return to neutral positions regularly to reduce fatigue. Extreme positions also require more movement. Rapid alternation of opposite extremes along any of the axes of movement is highly inefficient.
It should be understood that fingering "rules" are merely preferences enable choices between better and worse fingerings, based on what is easiest to execute accurately. In complex melodies, the various guidelines may conflict, forcing you to choose between several sub-optimal alternatives. By understanding the reasons for each "rule", you can then come to a reasoned conclusion about the best overall fingering.
Mostly 1-2-3: Bulgarian melodies are played mostly with fingers 1, 2 and 3. There is a school of classical piano which attempts to ignore mechanical differences between the fingers and, though extensive practice, build five fingers of essentially equal abilities. Whatever the merits of this approach may be in the classical realm, it is fundamentally untenable approach for Bulgarian accordion music. Bulgarian music must be rendered very precisely at high speed, and so proper use of the more able fingers is essential to playing it with power and grace. Fingers 1, 2 and 3 are stronger, surer and more agile than fingers 4 and 5, and so are to be preferred whenever possible. The primary reason for this is ornamental execution - clean, powerful ornaments using 5 are vitually impossible and those using 4 are significantly inferior to those using 1-2-3. Since strong ornamental execution is so fundamental to Bulgarian melody, the added complexity of using mostly 1-2-3 is repaid in terms of clean execution.
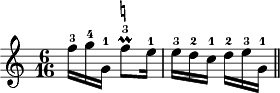
Alternate fingers on repeated notes: Bulgarian melodies should be played legato. Some may find this surprising, associating a detached, marcato style with melodic vitality. However, the power and drive in Bulgarian music comes from a combination of smoothness, precision and legato. At very fast tempos, legato becomes a simple necessity for technical execution. As a consequence, repeated notes, when they occur, should be played by alternating fingers. Repeated notes taken hopping on a single finger disturb the legato the of the melody. An example of alternating fingers for repeated notes follows.

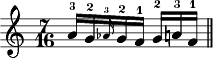
The only exception to this rule is double drop notes taken with the thumb. Note however, that triple drop notes should be alternatively fingered.

Thumb rarely on black: Placing finger 1 on black requires extreme insertion, which at some later point will need to be recovered from. Like extreme positions in any axis of motions, it is best avoided most of the time.
Gliding on a single finger from a black to an adjacent white key is an excellent technique for facilitating legato in tricky passages:

If your keyboard has a shallow draft, it is also possible to glide the thumb between white keys. This example is from a Varimezov paidushko:

A station is stable position of the hand used for playing several consecutive notes in a melody. At a station 3 (sometimes 4) fingers hover above particular keys, and the hand is inserted, angled and tilted so that it can play all the notes of the station with minimal effort and extraneous movement. As the melody progressed, the hand moves from station to station, smoothly adjusting insertion, angle and tilt as needed. Often the last finger of one station acts as the first finger of the following station, in which case the finger is viewed as a pivot between stations. Stations are labeled by the relevant fingers, listed in order from the lowest note to highest. A 123 station positions fingers 1, 2 and 3 in their natural order. A 213 station uses the same fingers, but with finger 2 extend over finger 1 to reach a note below it.
In the example below, a melody fragment is played at 4 stations, labeled S1-S4. Station S1 is a 213 station, while S2-S4 are 123 stations. Note that stations S2, S3 and S4 all share a finger and note with their neighbors, so you pivot between these stations. In contrast, S1 and S2 do not share a finger and note, so there is no pivot between them.

As a consequence of the "mostly 1-2-3" principle, 123 and 213 are most common stations used when playing Bulgarian melodies. Some alternatives follow.
134 can be a alternative station fingering (S2 below). When joined with lower 123 (S1) or 213 (S3) stations, the resulting fingering can reduce hand motion and repeated finger fatigue in scalewise passages:

1213 stations place 3 fingers on 4 keys. Fingers 2 and 3 are assigned a single key each, while finger 1 moves between two distinct keys as needed. This is useful in scalewise passages. In the example below, the 1213 stations are marked. At station S1, finger 2 is on B, finger 3 is on D and finger 1 moves between A and C as needed.

Finger 5 rarely comes into play except when jumping to a high note. S1 below is an example of a 125 station:

Ornaments alternate notes quickly, so they are almost always performed while at a single station. Due to the high performance requirement, the emphasis on fingers 1-2-3 is even stronger in ornaments than it is in outline fingering: 5 is never used and 4 is used only in specific restricted circumstances.
Prall fingerings are notated in temporal order (unlike station fingerings, which are in spatial order). Favored prall fingerings are 232 and 131. 121 is slightly weaker than 131, since fingers 1 and 2 more mechanically coupled than fingers 1 and 3. However, 121 is sometimes useful, especially when preparing to jump to a high note (see 125 station example above). Pralls fingered 343 are sometimes necessary to prevent really awkward fingerings, but should be avoided if possible. One good use for a 343 is when reaching up to a note that would be make at awkward 1-2 stretch (e.g. a 7th or more).
Another reasonable 343 usage is in scales with consecutive black notes. In such scales, you may need to choose between a 343 prall or placing finger 1 on a black note.

Due to conflicting fingering considerations, you may sometimes need to change fingers on a prall. In this case, 231 and 132 fingerings are acceptable. The former is usually stronger.

The notes that neighbor a prall (before and after) are best played with a finger not involved in the prall itself. Thus, finger 1 is best for playing neighbors for 232 pralls, finger 2 for 131 pralls, fingers 3, 4 or 5 for 121 pralls, finger 1 for 343 pralls.
Trill fingerings follow the same rules as pralls, but with an even stronger prejudice against 3-4.
Optimal mordent and antemordent fingers are not yet described.
In the diagram of a standard keyboard below, note that only G# is directly centered between its two neighboring white keys. Both F# and C# are displaced toward their lower neighbors, although for former is more so. Both A# and D# are displaced toward their upper neighbors, the A# more so. Historically, this was done to ease playing white keys with fingers in amoungst blacks when the hand is deeply inserted into the keyboard. Given the reduced keyboard size, this sort of playing less workable on the accordion (at least for fingers of my size). However, this keyboard geometry has signficant implications for hand position. The keyboard's geometry, with the black keys' mildly idiosyncratic horizontal arrangement and their elevation above the white, forms an uneven topography than the fingers must negotiate.

In preparation for play, the hand is positioned at the first melodic station with each finger resting lightly on (but not depressing) its assigned key in a relaxed and natural arch. The hand should be inserted, tilted and angled so that each of the posted fingers can easily depress its assigned key:
Insertion: The hand in inserted only as deeply as required to play the station notes. This follows from first principles, since deeper insertion would need to be withdrawn later, thus adding extraneous motion. Fingers on white keys are placed in the all white area of the keyboard, rather than in between black keys. With a mix of black and white keys in the station, finger arches may need to be slightly adjusted to accomodate.
Tilt: The hand is normally tilted neutrally at the beginning of a station. As the notes of the stations are played, adjusting tilt may make some notes easier to play.
Angle: Proper hand angling requires a more careful examination than insertion or tilt. Consider the example A1, A2 and A3 below. Station A1 contains all white keys, so a neutral hand angle is appropriate. The G# in station A2 is easier to play with the hand angled slightly right. The Ab in station A3 is easier to play with the hand angled slightly right. Proper angling prevents fingers from interfering with each other during key depression. Additionally, it allows finger arches to be more uniform, facilitating balanced alternation of keys.

Note that optimal angling varies as the hand moves between the upper and
lower keyboard. On the upper keyboard, the hand naturally angles further right
than on the lower keyboard. This can affect optimal fingering choices. The
example below shows the same passage played in two octaves. The 232 prall in
the lower octave requires the hand angles left, which is difficult to accomplish
in the upper octave, so a 131 fingering replaces it there.
With the wrist at the proper altitude, and the fingers in a relaxed natural arch, key depression is ideally initiated the with finger lightly touching the target key or slightly above it, and is executed with a soft touch and minimal extraneous motion. The direction of depression is a varying combination of key vertical and insertion into the keyboard. Depression via insertion is at first surprising, but is a natural consequence of the geometric alignment of the keyboard and arm.
During key depression the muscle at the knuckle flexes, creating a more acute arch and moving the finger downward into the keyboard. The other two joints of the finger may move in a variety of ways. They may stay relatively motionless, they may flex (arch more) or they may extend (straighten). Flexion of the smaller joints in not usually necessary, since the knuckle joint is stronger, and big muscle groups are usually favored. Flexion may be useful as part of a "brushing" motion that initiates a reposition of the hand. Extension of the smaller joints during key depression is an unexpected technique. It works by extending the length of the finger, which then digs or scoops into the key. Extension depression is expecially useful in the execution of the "limp-step" portion of pralls and trills.
NEED DIAGRAM HERE TO ILLUSTRATE FINGER MOTIONS
Extraneous motion degrades precision, an effect that becomes more pronounced as tempos increase. However, you can't change your basic mechanics at fast tempo, so must identify the extraneous motions and remove them at a slow one.
One type of unnecessary extraneous motion is a preparatory lift of the finger before depression. Most often preparatory finger lifts are merely uncontrolled motion that can removed. Occasionally such lifts appear necessary because the wrist is elevation is insufficient. In this case, adjust your wrist, don't lift your finger.
Another type of extraneous motion is moving other fingers along with the depressing one. All fingers but 4 can be easily moved independently of the others, and should be. However, 4 is anatomically tied to 3 and 5 is a way that makes its independent motion impossible. This is the main reason the use of 4 is generally discouraged.
Another problem is moving the hand along with the finger during depression. This may be caused by improper initial hand position, in which case reposition your hand first. This motion may also be caused by general tension in the hand, in which case - relax.
When depressing keys with the thumb, the above considerations of soft touch and minimal extraneous motion also apply, but the motion differs due to the thumbs distinct attachment point to the hand, and its horizontal mobility. When the wrist is raised in playing position, the neutral position position of the thumb is under the hand, appoximately below finger 2. The thumb angles down from the elevated wrist at an approximately 60 degree vertical angle to the keyboard, depressing the key with the left side of thumb tip. The middle joint of the thumb should be straight (though not "tight") during key depression. A wobble middle joint will impair speed and accuraccy of play.
With the thumb on a given key, the hand angles right as fingers 2-5 move up the keyboard to reach higher notes. This is accompanied by a slight rotation of the thumb around the key/thumb tip contact point. By the time finger 2 reaches the point of maximum 1-2 stretch (usually a 6th or 7th), this rotation causes fingers 4 and 5 to be rotated off the keyboard. Controlling large 1-2 stretches require a relaxed hand. The exercise below explores wrist angling in 1-2 depression:
 |
 |
When depressing consecutive notes at a station, a small adjustment in hand angle, tilt or insertion may improve mechanics. I'm still working at formulating the relevant rules. In the example below, the initial note of the G prall is depressed with an assist from the hand tilting slightly left.
For stability, finger 2-5 glides should be performed by moving the entire hand, not just the finger involved. If your keyboard has a shallow draft, it is also possible to glide the thumb between white keys. To glide the thumb upward, keep the wrist elevated and move the hand up the keyboard while the upper left thumb pad (rather than the tip) contacts the key. To glide the thumb downward, insert so that the middle joint depresses the key and move
Both glides and alternating fingers require a light, but controlled, touch where fingers vary their insertion, move easily in and out of the keyboard. This may be thought of a "skating" as opposed to "slipping".
Pralls are executed in three conceptual stages: preparation, initialition and limp-step. In all stages, a light touch and relaxed hand are critical.
Preparation refers to the note preceding the prall that serves as a launching platform for the prall. Ornaments execute quickly, the hand must be prepositioned so that minimal motion is required during the prall. Ideally, the preparation finger is distinct from the prall execution fingers and all three can be prepositioned over the keys they will depress. In practice, complex fingering and melodic context may such prepositioning impossible. In such cases, the hand will need to adjust position during the prall.
Initiation refers to the initial key depression of the prall base note. This depression should be clear, relaxed and assertive. Pralls will not sound bright unless the initiation is smooth, assertive and exact to the beat. A useful exercies is to practice melodies playing only the initial notes of the pralls, which allows you to evaluate the exactness and assertiveness of their initiation.
Limp-step refers to the execution of the last two notes of the prall, the "limp" (auxillary) and subsequent "step" (return to the prall base note). As indicated by the name, the limp-step is suggestive an uneven gain resulting from favoring one leg. The auxillary is lightly brushed as the base note is released, and the base note returns soon thereafter. When executed correctly, the limp-step notes are heard as a single musical idea, one that bisects to prall 8th note, thus preserving the 16th note pulse of the melody. Varying the exact timing of the limp-step affects the musical effect of the prall. By executing the limp-step earlier, the two pulse 16th are pushed closer together resulting in an intense, chopping effect useful in up tempo Shope horos and Serbian-style kolos. Executing the limp-step later results a smoother, more languid sound useful in music from Strandzha or Romania.
Limp-step execution (especially for a 232 prall) is sometimes easier if accomanpied by a slight insertion. In this case, a slight extra pressure toward the grill is exerted on the initiation (base) note. The auxillary brush (limp) allows the base finger to elevate and then fall at a new point slightly more inserted as a result of the grillward pressure. For a 232 prall, the limp-step notes are best executed as extensor depressions.
When the note preceding a 232 prall is fingered with 3, the rapid reuse of 3 in the prall can be difficult. In this case, initiation can often be assisted by tilting the hand slightly left:
Trill execution may be thought of as an extended prall with two limp-steps. This requires better control than prall execution, but requires no fundamentally different techniques.
Not yet written.
Not yet written
Copyright 2013 Erik Butterworth. All rights reserved.